A backyard makeover is exciting — until you realise the entertaining area is too small, the path cuts through the middle of the space, or the afternoon sun turns your new paving into a frying pan.
Most regrets come from one root cause: jumping to finishes before planning the layout.
This guide gives you a homeowner-friendly planning process that works particularly well in Sydney conditions: hot summers, heavy downpours, and a mix of flat and sloping blocks.
Step 1: Design for a normal weekday, not just a perfect weekend
Before you measure anything, answer this:
• Where do you have your morning coffee?
• Where do kids or pets play (if relevant)?
• Where do you dry laundry?
• Where do you store bins, hoses, and tools?
• How do you move from inside to outside with food and drinks?
If your design only works for a once-a-month gathering, it won’t feel like a win.
Q&A: What if I don’t know what I want?
Start with what annoys you now. Common Sydney backyard pain points include:
• No shade where you actually sit
• Water pooling after rain
• Not enough flat area for a table
• Poor privacy from neighbours
• Nowhere to store everyday items
Step 2: Measure the “usable rectangle” (not the whole yard)
Backyards often have awkward corners, side access paths, garden bed constraints, and setbacks. Instead of measuring everything and getting overwhelmed, define your usable rectangle:
• The area you can actually stand, sit, and walk on
• The area that makes sense for the main living functions
This becomes your design canvas.
Step 3: Map sun, shade, and wind like a Sydney local
Sydney’s light and heat patterns matter more than most people expect.
Do a simple sun map
• Morning: where’s the first comfortable sunny spot?
• Midday: where’s harsh glare or reflected heat?
• Late afternoon: where does the western sun hit hardest?
• Winter: Where do you still get light?
A planning reference that supports this kind of thinking is the NSW Government Architect’s landscape design guide.
Wind reality check
In many suburbs, you’ll notice:
• Breezes funnel through side passages
• Courtyards can be still and hot
• Elevated sites can get gusty
If you place your dining setting where the wind cuts through, you’ll stop using it.
Step 4: Put the “fixed” elements on the plan first
These are the things that are difficult or expensive to move later:
• Doors and thresholds
• Downpipes and stormwater points
• Levels, slopes, and drainage paths
• Existing mature trees you want to keep
• Side access requirements
If you’re dealing with slope, levels, or persistent pooling, it’s worth addressing that early — the “groundwork first” approach prevents rework. If you need help making these constraints fit into a cohesive plan, landscape design planning support can keep decisions aligned before you commit to materials.
Step 5: Zone the backyard using a simple “triangle” layout
A practical planning method is to set up three core zones:
• A hard “living zone” (seating/dining)
• A flexible “activity zone” (lawn/play/open space)
• A “service zone” (storage, clothesline, bins, utility access)
You don’t need equal sizes. You need sensible relationships.
Common Sydney sizing regrets (and how to avoid them)
• Living zone too small for chairs to pull out comfortably
• No clear route to the bins or side gate
• Activity zone squeezed into a narrow strip that’s hard to use
Q&A: Do I need a lawn?
Not always. Many Sydney households prefer a flexible surface that’s easy to maintain (or a smaller lawn plus planted edges). Decide based on how you actually live, not what you think a backyard “should” have.
Step 6: Plan circulation like you’re carrying a plate of food
Paths are not decoration. Their behaviour.
A simple test:
• Can you walk from the kitchen door to the seating without weaving?
• Can you get to the clothesline without walking through a garden bed?
• Can you access taps, hoses, and storage without moving furniture?
Circulation tips that prevent layout regret
• Don’t split the yard in half with a main path unless you have to
• Keep the main walking line obvious and direct
• Use planting to soften edges, not block movement
If you want to sanity-check circulation widths and furniture clearances before building, outdoor layout guidance can help turn “I think it fits” into “I know it works.”
Step 7: Choose surfaces based on heat, slip resistance, and runoff
In Sydney, surface choice isn’t just aesthetic.
Heat
Dark, dense paving in full sun can become uncomfortable in summer afternoons. Think about:
• Shade planning (trees, pergolas, umbrellas)
• Surface selection that stays more comfortable underfoot
• Where you’ll actually stand (BBQ zone, seating edge, path)
Slip resistance
If a surface gets wet, it needs to stay safe.
Runoff and drainage
Hard surfaces shed water fast. Always ask:
• Where will the water go off this surface?
• Will it create erosion in adjacent beds?
• Does it send water toward the house?
For stormwater principles and safe discharge thinking, the City of Sydney Stormwater Drainage Manual is a useful reference.
Step 8: Build the “regret reducers” into your plan
These are the small decisions that massively improve day-to-day use.
Regret reducer 1: Shade where you sit
• Plan shade on purpose (not as an afterthought)
• Consider how the sun moves — morning vs afternoon use
Regret reducer 2: Storage that’s near the action
• A discreet storage bench near seating
• A slimline cabinet near the side gate
• A spot for garden tools that isn’t inside the living room
Regret reducer 3: Privacy without turning the yard into a box
• Layered planting for screening
• Partial screens at eye level
• Keep upper areas lighter where possible
Regret reducer 4: Lighting you’ll actually use
• Safety lighting for steps and paths
• Ambient lighting for evenings
• One focal feature light (plant, wall texture)
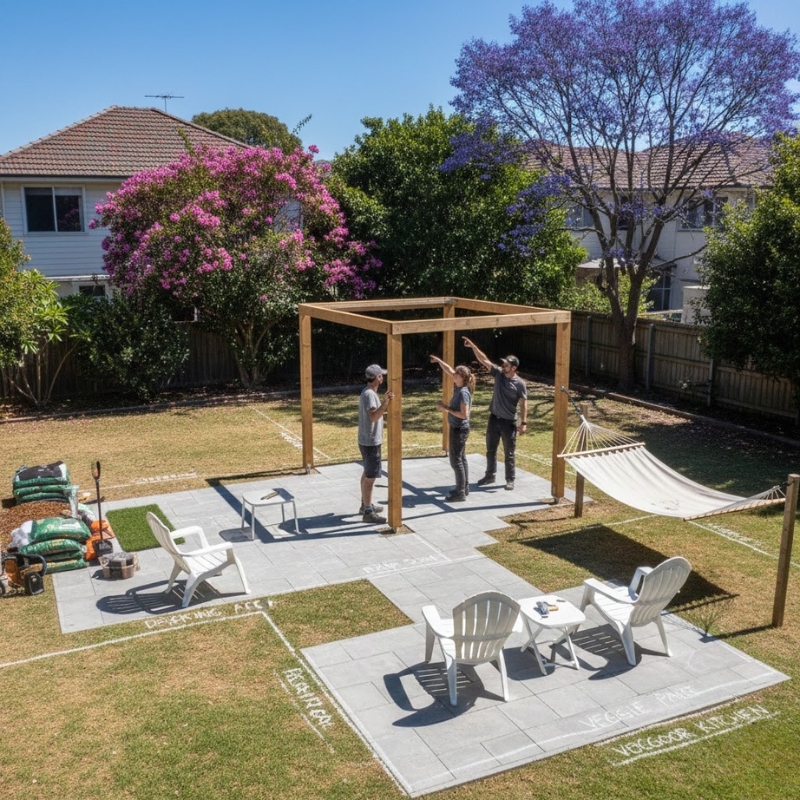
Step 9: Test the layout cheaply before you build
This is the most overlooked step — and the easiest.
Quick layout testing
• Mark zones with a hose, string line, or chalk
• Place outdoor chairs roughly where they’ll go
• Walk the routes you’ll use (kitchen to BBQ, door to clothesline)
• Check door swings and pinch points
If the “flow” feels awkward now, it will feel awkward after you pave it.
Q&A: What’s the most common backyard layout mistake?
Putting the entertaining zone where it looks best from the fence line — not where it’s usable from the house. If it’s too far, too hot, too windy, or awkward to reach, you’ll stop using it.
Step 10: Plan the makeover in the right sequence
A simple build sequence reduces rework:
• Groundwork first (levels, drainage, structural needs)
• Hardscape second (paths, paving, edging, retaining where required)
• Services third (irrigation, lighting, conduits, taps)
• Planting last (so plants aren’t trashed during construction)
This order protects your budget and your sanity.
Final FAQ
Where do I start with a backyard makeover in Sydney?
Start with lifestyle needs (weekday use), then map sun/shade and fixed constraints, then zone the space. Choose finishes after the layout works on paper.
How do I choose the right zones?
Use three core zones: living, activity, service. Size them based on how you live, not what you think you should have.
What should I do before buying paving or plants?
Confirm levels, drainage direction, and circulation routes. Test the layout with temporary markings and furniture.
How do I avoid heat and glare problems?
Plan shade intentionally and be careful with hard surfaces in full sun. Consider where the western sun hits and how reflective walls affect comfort.
Do I need to plan drainage even if my yard seems fine?
Yes — hardscapes change runoff. A yard that “was fine” can become a problem after paving if water is redirected.
How do I make the backyard feel cohesive?
Limit the number of surface changes, repeat materials, and use planting to soften edges and connect zones visually.